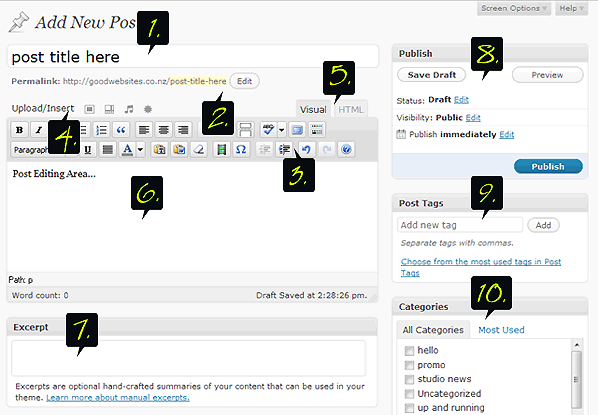
At its simplest, creating a post in WordPress requires you to go to Posts > Add New from the left-hand side menu enter a title and some text, and click Publish. And that’s it! Though there are more options available. Here’s an overview of the various post fields.


1. post title
The title of your post. You can use any words or phrases, commas, apostrophes, quotes, hypens/dashes, and other typical symbols.
2. permalink
After typing your title, the Permalink below the title shows the URL for the post. Commas, quotes, apostrophes, and other non-favorable characters are cleaned up and a dash is put between each word. You can manually change this if you want. Normally there is no need to mess around with the permalink.

3. toolbar
The toolbar uses the familiar icons common to word-processing software to format your post.
4. upload images
Hit the square box to launch the image uploader, which allows you to upload images into your post. The other icons are for uploading videos, audio (mp3) or media (general). Which normally is done via a plugin as this needs most of the time some sort of player as well.
5. visual or HTML view
Defines the way the content area is showing. Easiest to keep it on visual (WYSIWYG). But if you curious hit the HTML tab…

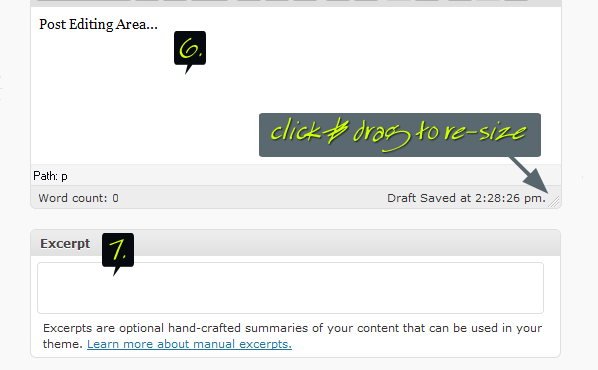
6. post edit area
The area where you enter your content.
Read this Quick tip for resizing the area.
7. excerpts
A summary or teaser of your posts. Note that the excerpt doesn’t usually appear by default. It only appears in your post if defined in the coding. If so, WordPress will automatically use the first (55) words of your post as the excerpt or up until the use of the More Quicktag mark. If you use an Explicit Excerpt, this will be used no matter what.
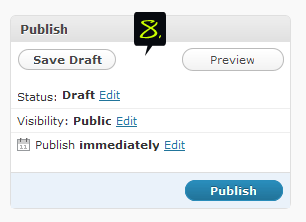
8. post publish box

Three big buttons: Publish to publish the post (or Update post when editing an existing post). Save Draft for saving the post to publish later. Preview allows you to sneak peak how your post will look before publishing it.
Status – main states are Published, Pending Review, and Draft.
Visibility – how does your post appears to the world. Select Public, Password-protect, or Private.
By default, posts are published immediately when you click Publish, but you can also schedule a post to be published in the future, or set the time back so that it appears to have been published in the past.
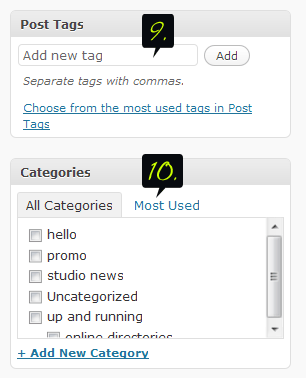
9. tags

Tags are micro-categories for your blog. Posts with similar tags are linked together when clicked one of the tags. Use your post main keywords for tags. Tags are a great way to browse through your blog (and a great SEO tool) so use them often and wisely.
10. categories
The category/topic the post can be classified in. Visitors can browse specific categories to see all posts in the category. Simply check the box(es) next to the category in the list to select categories for the post (or add a new category). You can view all categories or the most used categories. If you have not specified a category, the post will be marked as uncategorized (not a good idea…).
